On this page
Getting started as a designer on Tailore
Create your Tailore account, complete designer onboarding and open your Studio. This guide also explains where onboarding ends and what to do afterward.
Getting started with Tailore
Account creation, designer onboarding and your first look at the Studio
Before you begin
Tailore is built for custom-fashion professionals who want to showcase their work, connect with new clients, manage existing clients, or do both.
Tailore accounts are for adults.
You must be at least 18 years old and able to enter a binding contract to create a Tailore account or transact through it. An adult may order clothing for a minor and provide their measurements when they have the authority to do so. The full rule is in the Terms of Service.
Before starting designer onboarding, it helps to have the following ready:
- Your first and last name, plus a business email address (a business phone number is optional)
- Your Studio or brand name and the city, region and country clients should see
- A short Studio bio describing your work, up to 300 characters
- Whether you create Custom pieces, Made-to-order pieces, or both
- The services you offer, such as pattern making, fittings, alterations or fabric sourcing
- Portfolio images and a typical starting price for your work
Types of Tailore accounts
There is one kind of Tailore account, and it can be used as a client, a designer, or both. Creating a Studio is what activates the designer tools - there is no separate designer account to sign up for.
| Account use | What you can do |
|---|---|
| Client | Browse designers, send an inquiry, review proposals, submit measurements, follow project updates and make payments. |
| Designer | Create a Studio, publish listings, receive inquiries, manage client projects and receive payouts. |
| Both | Use one Tailore account to commission work as a client and operate a designer Studio. |
Create your Tailore account
Go to Tailore and select Join
Open Tailore and choose Join in the header. If you arrived through the For designers page, the Create your studio button starts the same account step first. Use an email address you can access.
Enter your email, then your name and password
Type your email address and select Continue. For a new address, Tailore asks for your full name and a password of at least 8 characters, then Create account. You can also choose Continue with Google when it is offered.
Confirm your email address
If Tailore sends you a confirmation link, open the message and follow it. Confirming your address is not currently required before you can continue, so you can start designer onboarding right away. Signing in with Google confirms your address automatically.
Complete designer onboarding
Designer onboarding is the one-time setup that creates your Tailore Studio. It is separate from publishing a listing or managing a full project. Signed in, select Create studio from your account page, or use the Create your studio button on For designers. The wizard has six short steps.
Tell us about your studio
Add your brand or studio name, your first and last name, and the business email Tailore should use for account communication. A business phone number is optional and never shown publicly. You also choose the country you are legally based in for payments - it sets up your payout account later, so pick it carefully. Tailore suggests a Studio URL from your name, which you can edit.
What location should clients see?
Add the city and country shown on your Studio profile. Your street address is optional and stays private. Then choose how clients receive your work: Domestic shipping, International shipping, or Local pickup - pick at least one.
What do you create?
Choose up to 8 specialties that describe your work, then pick your work type: Custom (designed from scratch or heavily customized for each client), Made-to-order (your existing designs, made after the client places an order), or both. Finish by selecting a typical starting price.
What services do you offer?
Select all that apply: design consultation, fabric and material sourcing, pattern making, measurement guidance, fittings, alterations, embroidery and embellishment, garment construction, or styling and accessory sourcing. You can update these anytime.
Show your work
Add portfolio images (up to 10 - the first becomes your cover) and write your Studio bio. You can start with fewer photos, but at least 3 are required before your Studio can appear in public discovery.
Review and create your Studio
Check the details clients will see, then select Create studio. Most Studio information can be updated later from your Studio dashboard.
Your Studio has been created
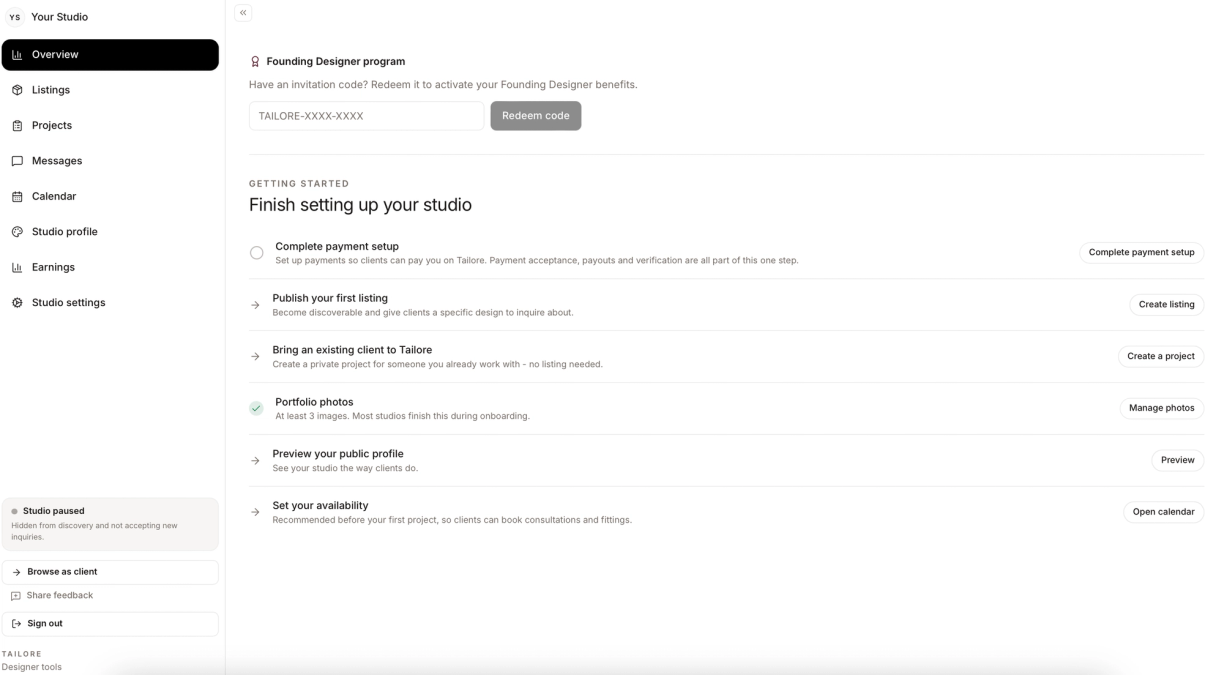
When you reach your Studio dashboard, the one-time designer onboarding is complete. Connecting payouts and publishing a listing are post-onboarding activation tasks, not part of the onboarding form.
Onboarding complete
You now have a Tailore Studio. The dashboard shows what remains before you can appear in search or receive payments.
New Studios start as "Direct link only".
Anyone with your Studio link can view it, but it does not appear in search or Find designers until you finish payout setup and switch Studio visibility to Public.
What to do next
Your next steps depend on how you plan to use Tailore. Both paths start from your Studio dashboard, and you can do either, both, or neither right away.
Marketplace path
Find new clients
- Complete your public Studio profile, with at least 3 portfolio photos
- Connect your payout account from Earnings & Payouts
- Create and publish your first listing
- Switch Studio visibility to Public to appear in Find designers
- Keep the "Accepting new inquiries" switch on
Private-client path
Manage existing clients
- Finish your Studio settings
- Connect payouts before requesting any payment
- Create a private project for a client you already work with
- Send your client the project invite link
- Run messages, proposals and payments from the project
Using Tailore for both?
Complete the marketplace setup, and use the private-project tools whenever you want to organize work with an existing client. A listing is never required for private projects.
FAQs
No. Onboarding ends when your Studio is created and you reach the Studio dashboard. Creating a listing is a post-onboarding task for designers who want their work discovered through the marketplace.
No. Private projects with people you already work with never require a listing. A published listing is only required for your Studio to appear in Find designers.
Before you publish a listing, make your Studio public, or take on new client projects - each of those needs payout setup to be finished first. Until then you can still edit your profile, upload portfolio photos and save listing drafts. Payout setup lives in your Studio under Earnings & Payouts.
Yes. The specialties, work types and services you choose during onboarding stay editable from your Studio, so your public profile can evolve with your practice.
No. You must be at least 18 years old and able to enter a binding contract to create a Tailore account. An adult may order clothing for a minor using their own account. See the Terms of Service.
Related articles
Was this article helpful?
Your answer helps us improve support content.